Close Menu

    Subscribe to Updates

    Get the latest creative news from FooBar about art, design and business.

    What's Hot

    Bathroom Wall Art Tutorial: Step-by-Step to Make & Personalize

    September 15, 2025

    Driftwood Wall Art: How to Make and Customize Unique Designs

    September 15, 2025

    How to Make Rosemary Oil for Hair and Customize It for Your Needs

    September 11, 2025
    Facebook X (Twitter) Instagram
    Facebook X (Twitter) Instagram
    Handicraft Magazine
    Subscribe
    • INTERIORS
    • EXTERIORS
    • HOUSE STYLES
    • KITCHENS & BATHS
    • Ideas
    • MAGAZINE
    • contact us
      • Privacy Policy
      • Advertise
      • Disclaimer
      • Terms and Conditions
    Handicraft Magazine
    Home»KITCHENS & BATHS»How to Build and Personalize a Wooden Bread Box at Home
    KITCHENS & BATHS

    How to Build and Personalize a Wooden Bread Box at Home

    HandicraftMagazineBy HandicraftMagazineJune 30, 2025No Comments4 Mins Read6 Views
    Facebook Twitter Pinterest LinkedIn Tumblr Email
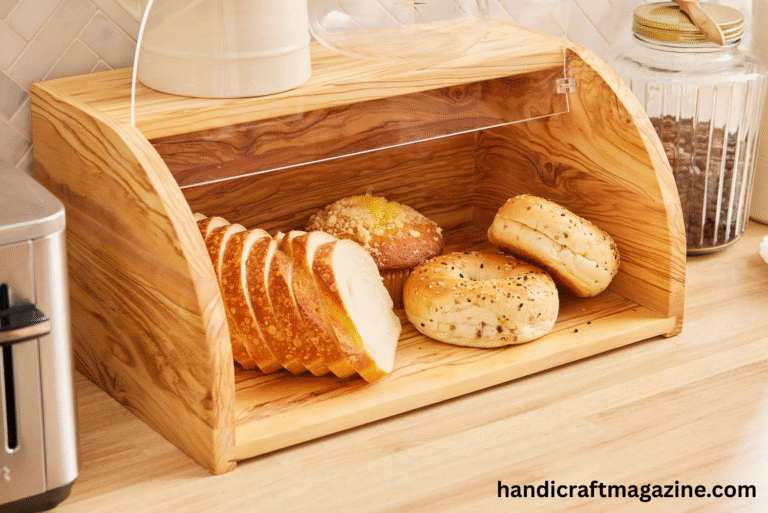
    wooden bread box
    wooden bread box
    Share
    Facebook Twitter LinkedIn Pinterest WhatsApp Email

    Introduction

    A wooden bread box isn’t just a kitchen accessory—it’s a timeless storage solution that brings charm and function together. With so many modern kitchens leaning on metal and plastic, crafting your own wooden bread box adds a warm, personal touch that stands out.

    In this article, you’ll learn how to make a wooden bread box from scratch and how to customize it so it fits your style perfectly. Whether you love rustic farmhouse vibes or sleek natural finishes, building your own bread box lets you mix creativity with practicality.

    Picking the Right Wood for Your Bread Box

    What Kind of Wood Works Best?

    For bread boxes, wood that’s both durable and breathable is key. Pine, maple, oak, or bamboo are all good options. These woods are sturdy, easy to work with, and help keep bread fresh by allowing just enough air flow.

    Preparing Your Wood

    Once you’ve picked your type of wood, cut your boards to size. Sand the surfaces to remove splinters and sharp edges. This step helps ensure your bread box is food-safe and feels smooth to the touch.

    Building the Wooden Bread Box

    Step 1: Planning Your Design

    Sketch out your bread box size and style. Will it have a roll-top, a flip-up lid, or a simple front panel? Decide based on the space in your kitchen and how much bread you usually store.

    Step 2: Cutting and Assembly

    Cut all wood pieces according to your design. Usually, you’ll need six parts: top, bottom, front, back, and two sides. Use wood glue and small finishing nails to assemble the frame. Make sure the joints are tight and aligned properly.

    Step 3: Adding Hinges or a Roll-Top

    If you want a hinged lid, attach it with small brass or nickel hinges. For a roll-top, you’ll need to groove side panels and use thin wooden slats joined with fabric or mesh on the inside. This takes more effort but gives a classic, vintage feel.

    Customizing Your Bread Box

    Painting or Staining

    Pick a wood stain that matches your kitchen, or go bold with colored paint. Water-based stains are easy to apply and safe for indoor use. For a distressed look, use sandpaper on corners and edges after painting.

    Carving or Woodburning

    Add a custom touch by carving or woodburning your family name, a fun design, or even a small phrase like “Fresh Bread.” These small details give your bread box personality.

    Decorative Handles

    Choose a unique knob or handle for the lid. Vintage drawer pulls or handcrafted ceramic knobs work beautifully and are easy to attach.

    Functional Touches to Consider

    Want to take it a step further? Line the inside with removable, washable fabric to keep crumbs under control. You can also drill small holes in the back for added air circulation, helping your bread stay fresh longer.

    Caring for Your Wooden Bread Box

    Keep your bread box clean by wiping it with a damp cloth. Avoid soaking it or using harsh cleaners. Every few months, you can rub it down with food-safe mineral oil or beeswax to keep the wood looking great and protected.

    Where to Place It and How to Style It

    A wooden bread box looks great on an open shelf, island, or corner countertop. Pair it with matching wooden items—cutting boards, utensils, or spice racks—to create a unified look. If you enjoy seasonal decor, change up the knob or place a small wreath on the front for festive charm.

    Conclusion

    Making your own wooden bread box is a fun, useful project that adds warmth and style to your kitchen. You get to choose the size, shape, and finish that suit your taste while learning new woodworking skills.

    By combining practical design with personal flair, you’ll create a piece that not only stores bread but also tells a story of craftsmanship and care.
    wooden bread box wooden bread box design
    Share. Facebook Twitter Pinterest LinkedIn Tumblr Email
    Previous ArticleThe Secrets Behind Japanese Style Houses That Bring Serenity
    Next Article How to Build a Wooden Bed Frame at Home Step-by-Step
    HandicraftMagazine
    • Website

    Related Posts

    How to Make Rosemary Oil for Hair and Customize It for Your Needs

    September 11, 2025

    How to Make Shampoo at Home | 3 Easy Steps to Make Your Own Shampoo

    August 27, 2025

    Custom Candizi Candy: DIY Recipe & Creative Customization Tips

    August 11, 2025
    Leave A Reply


    Latest Posts

    Bathroom Wall Art Tutorial: Step-by-Step to Make & Personalize

    September 15, 202510 Views

    Driftwood Wall Art: How to Make and Customize Unique Designs

    September 15, 20258 Views

    How to Make Rosemary Oil for Hair and Customize It for Your Needs

    September 11, 20254 Views

    How to Create Jesus Art Painting & Customization Tips

    September 9, 20255 Views
    Stay In Touch
    • Facebook
    • Twitter
    • Pinterest
    • Instagram
    • YouTube
    • Vimeo
    Don't Miss

    How to Make Shampoo at Home | 3 Easy Steps to Make Your Own Shampoo

    By HandicraftMagazineAugust 27, 2025

    Introduction Learning how to make shampoo at home is a rewarding and practical skill. It…

    DIY Papercraft Man: Simple Steps to Make & Customize Your Model

    June 23, 2025

    6 Easy Steps to Customize a Shampoo Base at Home for Perfect Results

    February 5, 2025

    Subscribe to Updates

    Get the latest creative news from SmartMag about art & design.

    About Us

    Handicraft Magazine is your destination for handmade art, crafting tips, and artisan stories. We’re here to inspire and connect everyone who loves creativity.

    We are always open to new ideas, partnerships, and collaborations.

    Email Us: Handicraftmagazine.com@gmail.com

    Our Picks

    Bathroom Wall Art Tutorial: Step-by-Step to Make & Personalize

    September 15, 2025

    Driftwood Wall Art: How to Make and Customize Unique Designs

    September 15, 2025

    How to Make Rosemary Oil for Hair and Customize It for Your Needs

    September 11, 2025
    Most Popular

    How to Make Shampoo at Home | 3 Easy Steps to Make Your Own Shampoo

    August 27, 2025869 Views

    DIY Papercraft Man: Simple Steps to Make & Customize Your Model

    June 23, 2025253 Views

    6 Easy Steps to Customize a Shampoo Base at Home for Perfect Results

    February 5, 2025184 Views
    © 2025 Designed by Handicraft Magazine.
    • Home
    • Advertise
    • Terms and Conditions
    • Disclaimer
    • Privacy Policy
    • contact us

    Type above and press Enter to search. Press Esc to cancel.